REPORT

Read Forrester’s People Analytics Landscape Report –  Download now →

Configure & Customize ActivTrak

Congratulations! You’ve accomplished the most difficult part of using ActivTrak, your agents are deployed and collecting data.

Confirm Agent Reporting

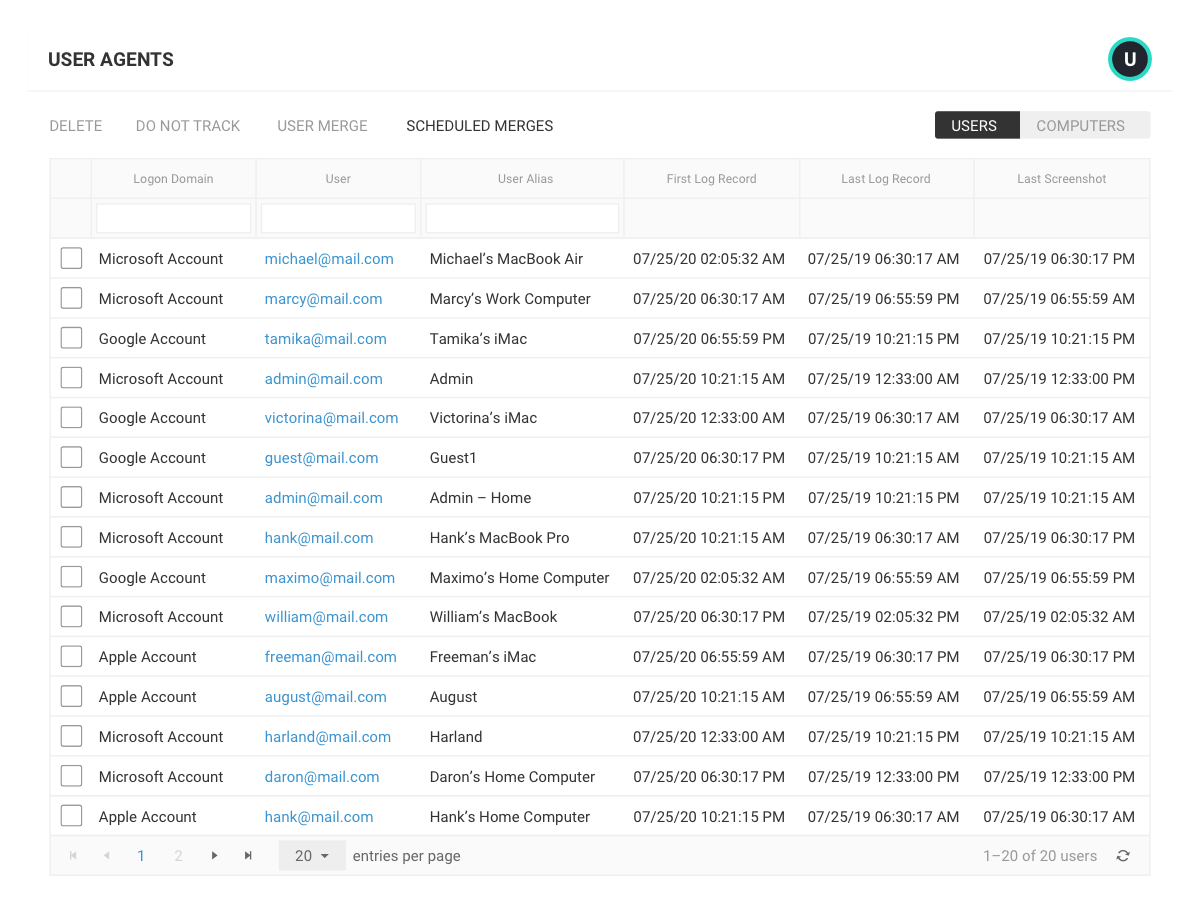
To confirm your reporting agents, ensure you have Admin access, then go to Settings > Users & Groups > User Agents on your left-side navigation menu. There you will be able to see all users with agents installed.


If you do not see any agents listed, reference this article to see the different methods to install agents to your user computers.


The agents you have installed will be listed here. You will see the Last Log Record indicating when those users were last logged in as well as the Logon domain. There may be other information populated on this page as well depending on your ActivTrak plan and how long your agents have been collecting data.


Configure Names & Aliases

To make your ActivTrak reports and dashboards easier to understand and accurately report user information across multiple devices and logins, you’ll want to configure your user and computer names.


Change the viewable name of a computer or user with an alias. When the agent is installed on a computer, it shows the registered name on the computer on all associated computer data. You can also use aliases to change the names of users in reports and combined variations of user names in a single alias.


To do this, select Settings > Users & Groups > Aliases


This article will show you how to create user and computer names with aliases to make your users easier to identify in your dashboards and reports.


Create User Groups

Groups allow you to group workstations together and segment data any way you would like. Each workstation in a group can still be accessed and viewed individually, but groups allow you to aggregate, segment and analyze specific clusters of data together.


To create groups, select Settings > Users & Groups > Groups in the left navigation. You can add a new group or add new members to an existing group.


This article shows you how to create groups.


Assign Productivity & Category Labels

Now it’s time to really make ActivTrak your own. Classifying Productivity helps administrators get a better sense of how productive their users are and makes dashboards and reports more robust and meaningful.


ActivTrak’s Intelligent Auto Classification feature will automatically classify most of the websites and applications that the majority of customers use with a productivity label and a category making it easy for you to get started. You can also customize labels to suit your needs.


Classifying activities can be done via the Activity Classification page. Go to Settings > Classification on the left navigation menu.


To learn more about classifying productivity, visit this article.


ActivTrak also offers a pre-built library of common descriptive categories with applications and websites classified accordingly. You can also customize this list to suit your needs. Categorization provides a better understanding of how various types of applications and websites are utilized.

To learn more about categorizing a website or application, visit this article.

Bonus: Helpful Resources

If you need additional assistance along the way, here are some helpful tips.


  • Visit the Getting Started checklist which covers a few more items you may find useful to configure in the application.
  • Visit ActivTrak Help Center to review “how-to” articles and other tips. Go to Help > Help Center in the left navigation menu. Search on a topic of interest to find what you need.
  • If you have questions or would like a product walk-through, click on the ‘green’ icon in the bottom right corner in the ActivTrak app, and someone from our team will respond to assist.
Create free account Get started
Watch 2-minute demo See a demo